
Solana has become the undisputed home of meme coin culture, with over 1.5 million tokens launched in 2026 alone. Thanks to transaction fees under $0.001 and near-instant finality, anyone can deploy a tradeable token in minutes for less than $10. This guide walks you through three practical methods to create your own meme coin on Solana—from beginner-friendly no-code platforms to advanced CLI and programmatic approaches. You’ll learn wallet setup, token creation, metadata configuration, and liquidity pool deployment. Expect to spend 0.1-0.5 SOL total and about 30-60 minutes from start to finish. This is a technical tutorial, not investment advice. Most meme coins fail, but understanding the mechanics helps you experiment responsibly in the Solana ecosystem.
Prerequisites: What You Need Before Creating Your Meme Coin
Before you create your meme coin on Solana, you’ll need approximately 0.1 to 0.5 SOL in your wallet and about 15 minutes to get everything ready. This covers transaction fees (typically $0.00025 per transaction) and rent exemption costs that keep your token account active on the blockchain.
Setting Up Your Solana Wallet
You’ll need a self-custody wallet that supports the SPL token standard. The two most popular options are:
- Phantom – The most widely-used Solana wallet with a clean interface and built-in swap features
- Solflare – A feature-rich alternative with advanced staking capabilities and hardware wallet support
Download either wallet as a browser extension or mobile app. During setup, you’ll receive a 12 or 24-word seed phrase. Write this down on paper and store it securely—never save it digitally. This seed phrase is the only way to recover your wallet if you lose access.
Once installed, your wallet will automatically generate a Solana address starting with a random string of letters and numbers. This is where you’ll send SOL to fund your token creation.
Funding Your Wallet with SOL
You’ll need SOL for two main purposes:
- Transaction fees – Each blockchain operation costs around $0.00025, but budget for 20-30 transactions during the creation process
- Rent exemption – Solana charges a one-time deposit (approximately 0.02 SOL) to store your token’s data on-chain permanently
Purchase SOL from a centralized exchange like Coinbase, Binance, or Kraken, then withdraw it to your wallet address. For first-time creators, starting with 0.5 SOL ($50-100 depending on market price) provides a comfortable buffer.
The SPL token standard is Solana’s equivalent to Ethereum’s ERC-20. Understanding that your meme coin will be an SPL token helps when selecting creation tools and understanding which platforms will automatically support your token once deployed.
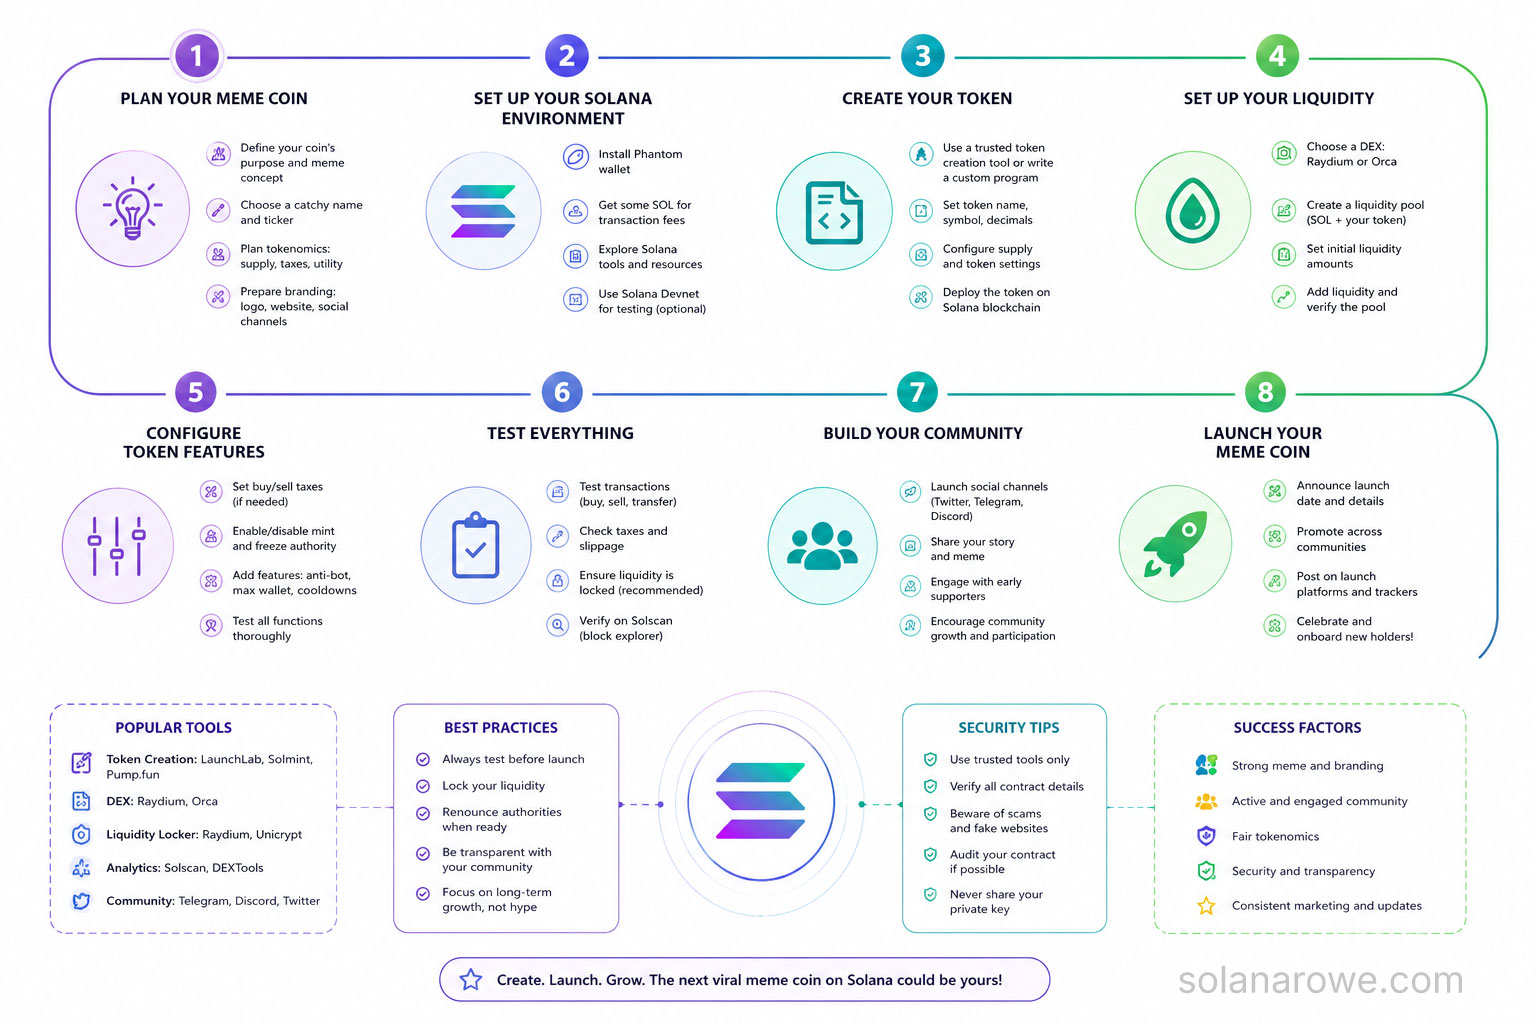
Understanding SPL Tokens and the Token-2022 Program
When you create a meme coin on Solana, you’re actually deploying a token using one of two token programs: the original SPL Token standard or the newer Token-2022 program. Both live on the Solana blockchain, but they serve different purposes depending on your project’s needs.
SPL Token Standard Basics
The SPL Token standard is Solana’s equivalent to Ethereum’s ERC-20. It’s the battle-tested framework that powers thousands of tokens on the network, from major DeFi projects to the latest meme coins. Every SPL token requires three critical parameters at creation:
- Decimals: Determines divisibility (typically 6 or 9 for meme coins, matching SOL’s 9 decimals)
- Mint authority: The wallet address that can create new tokens (often revoked after initial supply is minted)
- Freeze authority: Optional ability to freeze token accounts (usually disabled for meme coins to prevent rug pulls)
Most meme coin creators use SPL Token because it’s simpler, widely supported by every Solana wallet and DEX, and costs around 0.1-0.5 SOL to deploy. The standard handles the basics perfectly well for tokens that just need to exist and be tradable.
Token-2022 Advanced Features
Token-2022 (also called Token Extensions) launched as a backwards-compatible upgrade with features that were impossible in the original standard. This program includes transfer fees, confidential transfers, permanent delegate authority, and non-transferable tokens.
For meme coin creators, Token-2022 makes sense if you want built-in transfer taxes (a percentage of every trade goes to a designated wallet) or interest-bearing tokens. However, adoption is still growing. Some wallets and platforms don’t fully support Token-2022 extensions yet, which could limit your token’s accessibility. Unless you specifically need these advanced features, stick with standard SPL Token for maximum compatibility and liquidity on platforms like Raydium and Jupiter.
Method 1: Creating Tokens with No-Code Platforms (Pump.fun)
Pump.fun has launched over 1.5 million tokens on Solana since early 2026, making it the go-to platform for creators who want to skip the technical complexity. The platform handles everything from token deployment to liquidity pool creation, all through a simple web interface that takes about 5 minutes to complete.
The real appeal? You don’t need to write a single line of code or understand Solana’s SPL Token standard. Pump.fun automates the entire process while implementing a bonding curve mechanism that automatically manages liquidity and pricing as people buy your token.
Connecting Your Wallet to Pump.fun
Before creating your token, you’ll need a Solana wallet funded with at least 0.02 SOL to cover creation fees (roughly $4-5 at current prices). Here’s the connection process:
- Navigate to pump.fun in your browser
- Click “Connect Wallet” in the top-right corner
- Select your wallet provider (Phantom, Solflare, or Backpack are most common)
- Approve the connection request in your wallet extension
- Verify your wallet address appears in the interface
The platform doesn’t require you to approve token spending limits like Ethereum applications. You’ll only sign transactions when actually creating or trading tokens.
Configuring Token Parameters and Metadata
Once connected, click “Start a New Coin” to access the creation form. You’ll need to provide:
- Token name – The full name displayed everywhere (e.g., “Doge on Solana”)
- Token symbol – The ticker, typically 3-5 characters (e.g., “DOGE”)
- Description – A brief explanation or meme reference (max 280 characters)
- Token image – Upload a square image, ideally 512x512px or larger
Pump.fun automatically sets your token supply to 1 billion units and handles all metadata deployment to Solana using the Metaplex standard. This ensures your token displays correctly in wallets like Phantom and on DEXs like Jupiter.
The bonding curve mechanism means initial buyers get the lowest prices. As the market cap reaches approximately 69,000 SOL in total trading volume, Pump.fun automatically migrates liquidity to Raydium, Solana’s largest DEX. At this point, your token becomes tradeable on the open market with permanent liquidity.
Total creation cost runs between 0.02-0.03 SOL, with no additional developer fees beyond standard Solana transaction costs.
Method 2: Creating Tokens Using Solana CLI Tools
For developers seeking maximum control over token parameters and deployment, the Solana Command Line Interface (CLI) provides direct access to the blockchain without third-party platforms. This approach costs roughly 0.1 to 0.5 SOL in rent exemption and transaction fees, but gives you complete ownership of the token creation process.
Installing and Configuring Solana CLI
Before creating tokens, you’ll need the Solana CLI and SPL Token CLI installed on your system. The installation process varies by operating system:
- Install Solana CLI by running:
sh -c "$(curl -sSfL https://release.solana.com/stable/install)"on macOS/Linux, or download the Windows installer from solana.com - Verify installation with
solana --versionto confirm the CLI is working - Configure network using
solana config set --url https://api.mainnet-beta.solana.comfor mainnet (or devnet for testing) - Create a wallet with
solana-keygen new --outfile ~/my-wallet.jsonif you don’t have one - Set your wallet as default:
solana config set --keypair ~/my-wallet.json - Install SPL Token CLI:
cargo install spl-token-cli(requires Rust installation)
Token Creation Commands
Once configured, creating a token requires just a few commands. The SPL Token program handles all the heavy lifting:
- Create the token:
spl-token create-tokengenerates a new token mint address and returns a unique identifier - Create token account:
spl-token create-account [TOKEN_ADDRESS]sets up an account to hold your tokens - Mint initial supply:
spl-token mint [TOKEN_ADDRESS] [AMOUNT]creates your specified token quantity - Disable minting (optional):
spl-token authorize [TOKEN_ADDRESS] mint --disableprevents future token creation, establishing a fixed supply
For metadata, you’ll need the Metaplex CLI to add token names, symbols, and images. Without metadata, your token won’t display properly on wallets or DEXs. Install it with npm install -g @metaplex-foundation/js, then use the Sugar CLI tool to upload metadata following Metaplex Token Metadata standards.
The CLI approach works best when you need custom token extensions, want to automate deployment, or plan to integrate token creation into larger dApp infrastructure.
Method 3: Programmatic Token Creation with Web3.js
Building tokens programmatically gives you complete control over deployment, metadata, and integration with your applications. This approach works best when you’re launching a meme coin as part of a larger dApp, need to automate token creation for multiple projects, or want custom logic that no-code platforms can’t provide.
Setting Up Your Development Environment
Start by installing the necessary packages in your Node.js project. You’ll need @solana/web3.js for blockchain interactions, @solana/spl-token for token operations, and @metaplex-foundation/mpl-token-metadata for adding images and descriptions.
npm install @solana/web3.js @solana/spl-token @metaplex-foundation/mpl-token-metadataCreate a new Solana keypair for testing on devnet or load an existing wallet using your private key. Never hardcode production private keys in your source code—use environment variables instead.
Token Creation Code Structure
The programmatic flow involves four key steps: creating a mint account, initializing the token mint, creating an associated token account for your wallet, and minting the initial supply. With the SPL Token program, you’ll spend approximately 0.1 to 0.5 SOL for rent exemption and transaction fees.
Here’s the core creation logic:
const mint = await createMint(
  connection,
  payer,
  mintAuthority.publicKey,
  freezeAuthority.publicKey,
  9 // decimals
);
After minting, upload your metadata (logo, description, social links) to a decentralized storage solution like Arweave or IPFS. Then attach this metadata URI to your token using Metaplex’s Token Metadata program—this ensures your meme coin displays properly on wallets, DEXs, and aggregators like Jupiter.
The programmatic approach shines when you need to create multiple tokens, integrate token creation into a launchpad, or build custom vesting and authority management systems that update automatically based on your application logic.
Adding Token Metadata and Branding
Without proper metadata, your meme coin appears as a generic string of characters in wallets and DEXs. The Metaplex Token Metadata standard fixes this by attaching your logo, description, and social links directly to your token’s on-chain identity.
Preparing Your Token Logo and Assets
Your token logo is the first thing traders see on Jupiter, Raydium, and Phantom wallet. Get this wrong and your coin looks like a scam.
Recommended logo specifications:
- Format: PNG with transparent background (no JPEGs)
- Size: 1000×1000 pixels minimum, square aspect ratio
- File size: Under 500KB for faster loading
- Design: Clear and readable at 32×32 pixels (wallet thumbnail size)
Create a simple, memorable design that works at small sizes. Complex gradients and thin lines disappear when shrunk. Save your logo as logo.png and prepare a JSON metadata file with this structure:
{
  "name": "Your Meme Coin",
  "symbol": "MEME",
  "description": "The most based meme coin on Solana",
  "image": "https://arweave.net/your-logo-hash",
  "external_url": "https://yourwebsite.com",
  "social_links": {
    "twitter": "https://twitter.com/yourmemecoin",
    "telegram": "https://t.me/yourmemecoin",
    "discord": "https://discord.gg/yourmemecoin"
  }
}
Uploading Metadata to Arweave or IPFS
Decentralized storage ensures your metadata persists permanently without relying on centralized servers that could go offline.
Upload process using the Metaplex Sugar CLI:
- Install Sugar CLI:
npm install -g @metaplex-foundation/sugar-cli - Upload your logo:
sugar upload logo.png --keypair ~/your-wallet.json - Copy the Arweave URL returned (starts with
https://arweave.net/) - Update your metadata JSON file with the logo URL
- Upload metadata:
sugar upload metadata.json --keypair ~/your-wallet.json - Attach metadata to your token using
spl-token create-accountwith the metadata URI
Alternative: Use the Metaplex UI at metaplex.com for a no-code upload experience. Arweave charges a one-time fee of ~$0.50 per file, while IPFS is free but requires pinning services for reliability.
Verify your metadata displays correctly by checking your token address on Solscan or SolanaFM. It should show your logo, description, and links within 5 minutes of uploading.
Creating Liquidity Pools on Raydium or Orca
Once your token exists on-chain, it’s just data. Making it tradeable requires liquidity—a pool where users can swap SOL (or another token) for your meme coin. Without liquidity, your token can’t trade on decentralized exchanges, leaving holders unable to buy or sell.
Choosing Between Raydium and Orca
Both Raydium and Orca dominate Solana’s DEX landscape, but they serve different needs for liquidity pool creation.
| Feature | Raydium | Orca |
|---|---|---|
| Pool Model | Concentrated liquidity (CLMM) and standard AMM | Whirlpools (concentrated liquidity) |
| Initial Setup | More technical, better for experienced users | Beginner-friendly interface |
| Trading Volume | Higher overall volume, better price discovery | Strong for stable pairs and smaller projects |
| Fees | ~0.3-1% depending on pool type | Customizable fee tiers (0.01%, 0.05%, 0.3%, 1%) |
| Best For | High-volume meme coins targeting serious traders | New projects prioritizing ease of use |
Raydium typically sees more meme coin launches due to its integration with Jupiter aggregator and higher visibility. Orca excels at user experience but may have less immediate trading volume for new tokens.
Setting Up Your First Liquidity Pool
- Connect your wallet to your chosen DEX (Phantom, Solflare, or Backpack work with both platforms)
- Navigate to the pool creation page (on Raydium: “Liquidity” → “Create Pool”; on Orca: “Pools” → “Create”)
- Select your token pair (typically your meme coin + SOL)
- Set the initial price ratio by depositing both tokens in your desired proportion (example: 1 billion tokens + 10 SOL sets initial price)
- Review fees and confirm the transaction (expect ~0.4-0.7 SOL in fees for pool creation)
Initial liquidity amount matters. Starting with 5-10 SOL provides enough depth for small trades without massive slippage. Going below 2-3 SOL makes your token vulnerable to extreme price swings from single purchases.
Two critical risks deserve attention: impermanent loss occurs when the price ratio between your paired assets changes significantly, potentially leaving you with less value than holding. More dangerous for meme coins is the rug pull risk—you control the liquidity keys. Removing liquidity after others buy crashes the price to zero. Consider burning LP tokens or locking them with services like Streamflow to build trust.
Tracking Performance and Managing Your Token
Most meme coins fail within their first 48 hours. Knowing where to look for early warning signs separates creators who adapt from those who watch their token flatline.
Essential Analytics Tools
Birdeye and DexScreener serve as your mission control after launch. Both platforms aggregate real-time data from Solana DEXs, but they excel in different areas:
- Birdeye offers comprehensive wallet tracking, showing you exactly who’s buying and selling. You can monitor top holders, identify potential whales, and track your token’s social mentions across Twitter
- DexScreener specializes in price charts and liquidity analysis. Its interface updates faster during high-volume periods and displays critical metrics like 24-hour volume, liquidity pool depth, and transaction counts
- Solscan provides the blockchain-level view—transaction history, token supply distribution, and wallet addresses interacting with your contract
Check these metrics daily during your first week:
- 24-hour volume: Below $1,000 signals trouble; consistent $10,000+ shows genuine interest
- Holder count growth: Healthy tokens gain 50-100+ new holders daily in early stages
- Liquidity depth: Less than $5,000 makes your token vulnerable to massive price swings
- Buy/sell ratio: More sells than buys for 3+ consecutive days indicates fading momentum
Post-Launch Token Management
You still control critical authorities unless you explicitly revoked them during creation. The mint authority lets you create new tokens (instant community trust killer if used), while the freeze authority allows locking specific wallets.
Most successful meme coin creators publicly renounce these authorities within 24 hours and verify the transaction on Solscan. This transparency builds credibility, but it’s permanent—you cannot undo authority revocation.
Marketing determines survival more than tokenomics. Without active community engagement on Twitter, Telegram, or Discord, even technically solid tokens disappear. Pump.fun data shows that less than 1% of launched tokens maintain $100,000+ market caps after 30 days. Set realistic expectations and budget time for daily community interaction, not just token monitoring.
Final Thoughts: Choosing Your Creation Path
You now have three distinct paths to launch a meme coin on Solana. Use Pump.fun if you want the fastest, simplest deployment with automatic bonding curves and liquidity migration—ideal for testing ideas with minimal technical overhead. Choose the Solana CLI when you need granular control over token parameters, plan to revoke authorities immediately, or want to avoid third-party platforms entirely. Go programmatic with Web3.js if you’re building a launchpad, need to automate multiple token deployments, or want to integrate token creation into a larger dApp.
Solana’s sub-cent transaction fees and millisecond finality make it the most cost-effective blockchain for meme coin experimentation. But remember: technical deployment is the easy part. Less than 1% of tokens survive their first month. Success requires genuine community building, transparent authority management, and realistic expectations about market dynamics.
This guide is educational content, not financial advice. Most meme coins lose value quickly. If you’re experimenting, start small, renounce mint authority publicly, and lock or burn liquidity pool tokens to build trust. The tools are accessible—use them responsibly.
Key resources: Pump.fun for no-code creation, SPL Token documentation for CLI reference, Metaplex for metadata standards, Raydium and Orca for liquidity pools, and Birdeye or DexScreener for analytics.